Saturday, January 30, 2016

Bus Stop in Alphington

I have just realised that I know NOTHING about Instagram!  I tried to look up the bus stop I saw at Alphington and couldn't find the links, despite doing a search that said I had found some information.
Pictogram is a problem for me too.

That's probably why I am still blogging when I have heard it is passé now.

Not to worry, I am enjoying the blogging. And, as I have stated that it is a visual diary too, I am not worried about new-fangled trends. In fact, I did use it recently to see how I had done a previous technique that I wanted to try again.

So …

I have driven past this bus stop in Alphington a few times recently and loved the glimpses I have caught of the inviting room. It is not in a spot conducive to pulling over.


Today we were taking our dog for a walk and I said we should go past this very interesting art installation. We turned off just before the bus stop and parked behind the empty buildings of the old APM site. It is a fantastically desolate site. A couple who were walking by said that it had been used to make an E grade movie about vampires a few years ago, when the site was first sold off. I can see why it was chosen.


But it was the bus stop that was my destination - I had to go and see it close up, getting more detail than you see just driving by.

 The bus stop looks rather ordinary as you approach it from the street.

 Then you see it close up - fabulous.


I don't know who is doing it but I do know that I derive great enjoyment from seeing it. I think it has developed over the days. I hope it is allowed to stay.

Sunday, January 24, 2016

A Different Sunset

After I attended the tapestry workshop with Joy Smith, at the Wangaratta Art Gallery, I started a small tapestry at home. It was based on the sunset photos that I have been using as inspiration for most of the year.

I am also working on it for the online group's yearly challenge. This year it is Flight.
I downloaded some images of birds in flight from 123RF. Using Photoshop, my favourite program, I inserted a bird.
They ask you to acknowledge the source, so here it is.


Eventually, I decided that two birds would be better. I just pasted the bird image into Photoshop and resized it. I debated having three, that being a much more artistic number but decided that I couldn't manage to weave a smaller one.

Then I got sidetracked by discovering a call for entries for a quilt. Several weeks of work went into that.

But I am back to the tapestry now. I thought I had about a third more weaving to do but discovered that I was almost finished.

It is cut off the loom now and all I have to do is put the backing on.

I used the photo as a guide, rather than a definite cartoon, and the colours have moved around a bit. Not to worry, it isn't supposed to be a photograph.

I am not that keen on it, it is rather pink and purple. But I did manage to keep my sides from coming in too much. I was reminded, at the workshop, to leave plenty of weft in and the pulling in wouldn't be such a problem. Now all I have to do is practise (of course!) and try not to have the little lumpy bits. It is not a great piece of art but I am happy that I have nice even edges.

I don't usually finish off with the braiding, I usually use the small tapestry technique. I REALLY need to practise the braiding!! I seemed to be all thumbs, as they say. So I will try to find an image I like and do another small piece, with a view to working on my weaving and finishing off techniques.

Saturday, January 23, 2016

Finishing off the banner quilt

After I had sewn on the silhouette, I then had to put on the border. I had done some other pieces, when I was doing the design course through the Embroiderers' Guild, that were based on my sunset photos. I had not sewn borders on them, I had just satin-stitched the edges. They didn't have the extra layer of wadding that I have used for the A Matter of Time piece.
You can see one here - I was developing the idea for this piece, unbeknownst to me at the time.

I had done the majority of the sewing on the banner quilt without a backing piece of fabric. This made it rather messy for the machine, meaning I had to brush it out more frequently than usual. It also meant that any mistakes, tangles, etc, will be hidden when I finish it off!

The back of the quilt, before I put the backing on.

However, I did put the backing on before I sewed on the silhouette. And I did some extra quilting in the parts where the tree didn't cover the image. Just to be sure that the backing wouldn't move around.
I remember being told, in my beginner quilting classes, that you should never have more than a handspan free of quilting.

To finish off, I had to decide what I wanted, an obvious border or something that would, hopefully, blend in. As I have been using small pieces of fabric, I didn't have many pieces that would be long enough to do the border.

I managed to find some that seemed to echo the colours on the quilt and joined them together to make my edges. The silhouette made it easier, I could just put black on that edge, and I could use the border to extend the bottom part of the silhouette.
So here it is, the finished piece. 

Friday, January 22, 2016

A Matter of Time

I was extremely happy to hear that my work has been accepted to the exhibition A Matter of Time. The news came through yesterday, absolutely making my day!

You can go to the official page on the link at the side or the Facebook page here (and on the symbol on the official page).

My sunset banner quilt is the piece I entered.
My thoughts were along the lines of how crowded our lives can be, how much we try to fit in. Despite how we try to make time slow down or speed up, time has its own rhythms, the sun will set at the end of every day. (That's not exactly my statement, it is just how my thoughts were going as I worked on it.)

There was a lot of time put into the quilt too.

After I had cut out the silhouette, I laid it out carefully and then ironed it onto the background.

Then I sewed around all the edges. It was quite tricky to see if I had done all the edges but I think I have.

You can see some cones of tapestry yarn in the background. I used some of them to carry colour across areas. I also used various knitting yarns and the ribbon from an old blanket that we had washed. The ribbon disintegrated off the blanket but was still looking good enough to be incorporated into some work. I just couldn't bear to throw it away, as usual.
The whole quilt is made up of strips, scraps and yarns. Except for the backing, of course, and the silhouette.

Thursday, January 21, 2016

Putting the silhouette on

After deciding to go with the tree image, I then had to work out how to put it on.
I had thoughts of putting on a silhouette and then free motion sewing the leaves.

You might notice that the image is the reverse of what I wanted, I forgot that you have to reverse things when using Vliesofix.

It might have turned out alright but this piece, as you can see from the cutting mat, is less than 30cm. It would look different when enlarged to fit a 1metre piece. I thought the leaves would look too little, or that it would take a LOT of sewing to make them look in proportion. 

I decided to just go with the silhouette as it came out. I got my picture, that I had worked on in Photoshop, and decided to print it out full size. This caused some working out too. I know some printers let you organise a large photo to print out at A4 size by dividing the picture up for you but I couldn't remember how to find that function. I did a rough cut and paste of the image, estimating the A4 size. I allowed for some overlap, fortunately. Then I stuck the printouts together and had an almost lined-up tree. 

Because I had practised on the sample above, I remembered that you have to then trace the image in reverse onto the paper side of the Vliesofix. Being frugal, I had printed my image out on used paper, to save the world, and had a bit of trouble seeing the image through all the print. Out came the light box - another great invention. The image was then traced onto the back of the paper, ready to be traced, yet again, onto the Vliesofix.

Eventually, the image was traced onto the Vliesofix and I was able to iron it onto the fabric. All that tracing had gradually reduced the finer details, which was probably a good thing. 

Then came the even more time-consuming task of cutting it out. Many years of teaching children how to cut out various shapes gave me good strategies for going round all the little curly bits. Small, pointy, sharp scissors helped too. 
There are quite a few leftover pieces, some quite tiny. So far I have held on to them, thinking that I might find a use for them in the future. No wonder I have a lot of stuff!

Friday, January 15, 2016

Still playing around with the sunset images

I had to post today, it is 15/1/16.

I have done more on my banner quilt.  I laid out the scraps and sewed them on. I did use Vliesofix to hold them in place. The background was looking rather boring really, so I had to give it a focal point.
The image that inspired me had the city at the bottom. But that was a landscape image and would not work so well with the portrait orientation. (You can just see my printout beside the fabric.)

I cut up some paper to see what I might do.


I have decided the tree will be a much better way to go, it covers more of the background.

Now to go through my photos and find a tree image that I can use. I used Photoshop to cut, crop and take out the colour.


Then I'll have to work out the size I want and print it out so I can trace it. No freehand drawing for me, I never like what I produce that way.

Monday, January 4, 2016

gorgeous sunsets

I am currently working on a banner quilt, based on my old sunset photos. (It is not turning out as well as I had hoped but I may be able to rescue it.)


I just came across a blog post about using a sunset background.

Then I came across a news article about the wonderful sunset we had last night. The colours in these are amazing. You could think it was the end of the world in some, rather than the end of the day.

Seems my obsession won't be dying down soon.

Saturday, January 2, 2016

Natural sculpture

The very hot day has passed and now it is much more bearable. But we still went out in the morning, before it got too hot and while it was overcast.

Walking along, I thought I saw a sculpture. Upon closer examination, it was a natural piece of art - a broken branch fallen to look like an animal.


I suppose it is possible that a passer-by stood it up to look like a sculpture but it is right under the branch it has fallen from. I prefer to think of it as natural art. 

Friday, January 1, 2016

Bird pests

I often take our dog, Penny, to a local park. Quite frequently I have to drag her away from where someone has obviously put half a loaf of bread for the birds. So I was very interested to see this sign:
The fine print is about how feral birds compete with native birds for nesting spots and food. Actually, we really don't like the Indian myna as they take over the nests of other birds and kill the babies.
The birds specifically mentioned on this sign are the Indian myna, the sparrow and starlings.

I often go to this park and usually see at least five different sorts of birds. Today was no exception. The birds were either suffering from the heat or have become used to dogs. They allowed us to get quite close to them before moving away - if necessary.

Penny was unfazed by the birds also, mostly ignoring them.
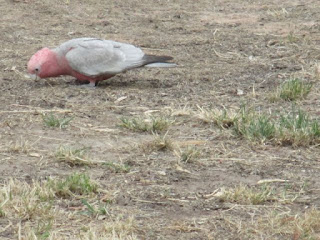
Galah, a pink headed one.


We got a bit too close!
Maybe I could design a tapestry from this. Our online group is working on the theme Flight.
The magpie was keeping an eye on us but not too worried.
Too close again, it flew up into the tree.

Kookaburras not too worried about us either. We suspect they were waiting for the people in the house to feed them.
I couldn't resist taking a couple of pictures of the trees, to add to my already vast store. This one was so obviously twisted anti-clockwise (as I have posted about before).

It was very dry in the park but the birds seemed to be finding plenty to eat. 
What a difference a bit of water makes though. This tap is for people and dogs to drink at.