Thursday, April 30, 2015

Collage exercise

We are currently working on making collages in our design course.  For the first time, I took fabric to the class, as we were instructed to do.

I took a small sample of fabrics as I had nothing in mind to do. I'm not sure if this was a good idea or not. It did mean that I didn't have too much stuff to think about but I also came up with a rather muted collage.


One of the exercises was to make a recognisable image using collage.  Quite a few of us chose trees, without any collaboration about what to do.

Then we were to cut the collage up and put it back together in a pleasing design.
 I did a very rough drawing of my tree, then cut that up to see if I thought it might work.

We ran out of time (due to other things happening in the class) and I finished it at home.

I cut it up and laid it out in a variety of ways, using the same background cloth. Not very inspiring!


I came across a piece of fabric that I had recently sun-dyed; it seemed to be in a similar colour range, so I decided to use that.

Turns out it wasn't such a good idea as all I could see was the background and not the original collage.  Then I put some more little bits of fabric over the stronger parts of the background, trying to mute it down to a similar level.

Once I thought it might do, I did some free motion sewing.

It took hours to play around with and all I have ended up with it a piece that I think might make a background for something else - or to go in the samples folder.  Lucky it was just an exercise.

But I have confirmed something that has been becoming clearer to me lately, in my sewing and tapestry weaving - I like texture.

Friday, April 24, 2015

printing onto interfacing did not work!

Well, that was really NOT a good idea.  I printed the image onto the interfacing, allowed it to dry for at least 24 hours and then ran a small piece under water - the colour washed off instantly!

Undaunted, I then tried ironing it, hoping that it might heat set.  Same result.

But I decided if I made it into a wall hanging that would never be washed, it might not matter.  I made a small dragonfly, while practising the new technique for the free motion sewing I was doing with Meredith Woolnough.

I have mounted it onto the interfacing background, which has been ironed on to the left-over piece of foam core board.  It doesn't look too bad, now I just have to leave it in a sunny spot and see if it fades.  At least that shouldn't happen as quickly as the water washed it away.  However, I suspect it won't be colourfast either.

I decided to mount the dragonfly image anyway, it would be good practice in mounting with pins, covering them with bugle beads and bending the backs of the pins down - not an easy thing to do.
Taken with flash, shadows make it look out of focus.

Taken in daylight, dim day, not great shadows. 

I did look up information about the inks in our printer.  It seems as if they may be pigment but I am suspicious as the box does not have the information on it, so I will have to investigate this further. There are too many variables at this stage for me to say why the idea didn't work, I just know that it didn't.

More work needs to be done on various aspects of this idea, but don't hold your breath waiting for me to do it soon. I think I will try the reliable pre-prepared fabrics you can buy, at least I know that they work.

Tuesday, April 21, 2015

image and text homework

Our homework this time is causing me trouble. It is to combine a photo that means something to me with some text. Everything I come up with is trite or too personal for putting out there.

As part of our discussion in class, we talked about various ways of getting images onto fabric. I have played with this idea before (here and here) but have never come up with one that I think is wonderful. It was fun to do and I learnt about the program and the process but I haven't had a good idea for its use yet.

In desperation, I went through some old files and came across some playing I did with Photoshop. I have quite a lot (QUITE a lot) of photos of Penny swimming in the Yarra.

I took one of these, at some stage, and played around with getting a textured background image. I can't quite remember which picture I used but it will have been very similar to this one.

 I cropped part of the water and then played around with colour.
The middle one is from the actual photo, then I played with hue and saturation.
I have been looking at various sites on how to transfer images to fabric and paper, as well as reading a few books that have some ideas. The most reliable seem to be ones that used pre-prepared fabric for feeding through the inkjet printer. Quite a lot of ideas come from the ATC books and articles.

I can't remember where I saw this idea (if I didn't misread or imagine it) but I tried it today.
I took another image I had, enlarged it quite a bit and played with hue until I got it to a bluish colour. It turned out quite pixilated but I decided I didn't mind the effect and went ahead and made it A4 sized.

Then I cut a piece of interfacing to A4 size, taped the leading edge to a piece of photocopy paper and put it through the printer - hoping like mad that it wouldn't mess up the printer!
It is not quite as pale as the photo makes it look but it is paler than on the computer.

I have an image. I don't know how colourfast it will be. I am leaving it to dry for 24 hours and then might take a piece and see if it is washable. Not that I intend using it as a wearable or quilt piece, it is just for experimenting with at this stage.

The interfacing is heat adhesive on one side, so I hope the heat sets the print as well. I haven't looked to see if our cartridges are pigment based, which are the more recommended sort, so it might all be just a waste of time. I suppose I will find out soon.

I am not going to fuss about the text at this stage, it is stopping me from playing as I can't think of anything exciting to include.

Friday, April 17, 2015

The AQC 2015

I went to the opening day of the Australasian Quilt Convention yesterday. I mainly went because I wanted to have a look at a new sewing machine and there are many of the suppliers with stands there. I don't need a lot of the things that the really big, fancy machines do so I targeted my looking.

I spent quite a lot of time at the Husqvarna stand, getting good one-on-one attention. I really like the machine I was shown. I decided not to go to all the other stands as I would just get overwhelmed with the differences that will be fairly minimal. My old machine is a Husqvarna (bought in 1982, we think) and I have been very happy with it. So I am hoping that the company still has the same good quality workmanship (workwomanship?).

After that I had lunch and wandered around the stalls, wending my way to the exhibition. There was a lot of beautiful stuff on sale! But I had decided that I do not need anything new at this stage except, possibly, a new sewing machine so I didn't look very closely at the stalls.

There were several exhibitions on display. I started looking really closely at the works, taking photos and trying to be a good textile student. But there were so many that I then decided to just enjoy the quilts and take the occasional photo.

Here are some images that I got.
Of course, I had to take a photo of the beautiful building. Apparently it is the only building created for international exhibitions in the 19th century that is still used for exhibition.


The True Blue Challenge (you can see all of them here).

Denise Griffiths

I took this of the group, mainly because the face was not at all obvious from close-up. 

A selection of Jan Irvine-Nealie quilts.
I remember going to a talk by her at the Victorian Embroiderers Guild and was awestruck by her work, as I was this time too.


Then there was the Gallipoli Quilt, a 12 metre installation of quilts, also amazing.  All done by the one person, Lucy Carroll.

Of course, there were many other quilts there, this is just a small sample.

I found some of the quilts inspiring and can't wait to start playing around with ideas - which enthusiasm may well dry up once I have a working machine again.

Monday, April 13, 2015

Ballarat Fibre Arts workshop 2015

I have been away again.  I really enjoy the opportunity to go to these workshops.  It is a chance to spend a week with like-minded people, hear no news, read no newspapers and just have a wonderfully relaxing time.

It is also usually creatively challenging too.

This year I attended a free motion machine embroidery workshop run by Meredith Woolnough.  I had not done a lot of research but did find this very interesting YouTube posting. I had not heard of this series of videos but will be looking for more.

Meredith had sent out an email well before the class, asking us to have our machines serviced as we would be giving them a thorough working out.  I dutifully sent it away and when it returned was not happy with the noises it was making, despite the fact that it was sewing.  So I returned it, only to be told that he could find nothing wrong. So I took it away. Of course, it did not last the week.  I had taken a small Toyota sewing machine as an emergency back-up. It is not set up for dropping the feed dogs and, despite being able to do loose free motion sewing (I used a teflon sheet to cover the feed dogs) it couldn't handle the thicker sewing.
The thinner sewing done on the Toyota machine. 

I used this piece of foil to help it dry in a non-flat shape.  It became one of the flowers in the picture below.

Meredith very kindly allowed me to use her Bernina demonstration machine.  It was like driving a car when you are used to a bike!  But it got the job done wonderfully!

We had a lovely week.  Meredith would give demonstrations and make suggestions but we all worked on our own ideas and designs and came up with very different pieces.

We started off with samples,
This is a small leaf shape that was pinned to baking paper to dry. Then it was embedded in resin. 
we had to make something to decorate the main table in the dining room, so that was another sample.

Then we spent a couple of days working on our main pieces.

I was very pleased that Meredith showed us how she mounts her work - something that is not often done at workshops.  It is very effective but not as easy as it sounds!  But it enabled me to layer my work at slightly different heights.  One element of Meredith's style is that shadows play an important part of the design, due to the raised elements of the pieces.


Here is the final display, ready for the gallery showing of all classes. There are some small pieces on the table that were embedded in resin, a part of the workshop also. 

Friday, April 3, 2015

Cityscapes

We are having a bit of a break in our design classes, mainly due to the Easter break. I have taken advantage of this and am trying to come up with a series of small machine embroidered pieces.

I have been diligently taking photos from the top of the cliff nearby, it looks towards the city.  I have quite a lot of photos now.
One of MANY photos from this vantage point.
I have been debating how to use these and have even thought of doing a tapestry based on one or two of the photos.  Our tapestry group met last week and I took along some printouts of some of my photos.  I haven't started the tapestry as I am not sure I actually want to do this design.  One of the ladies present suggested that I not do the actual scene, that I leave out the city and just concentrate on some of the skies.  I think she has touched on what has been holding me back - the reproduction of photos, of doing realistic scenes, is not quite what I want to do.  This could partially be because I don't think I will do a good job, especially in the proportions I am thinking or working in. But I also have this thought that if I can reproduce a photo, what is the point really?  I already have the photo.

So it was suggested that I take parts of the skies that interest me and just do those bits. I like this idea, I just have to think more about it.

In the meantime, while I have been thinking about it, I have decided to play around with the images in another medium.

I have done some fabric collage and have come up with some small pieces.  I decided to return to the Olga Walters type or work I enjoyed so much previously.

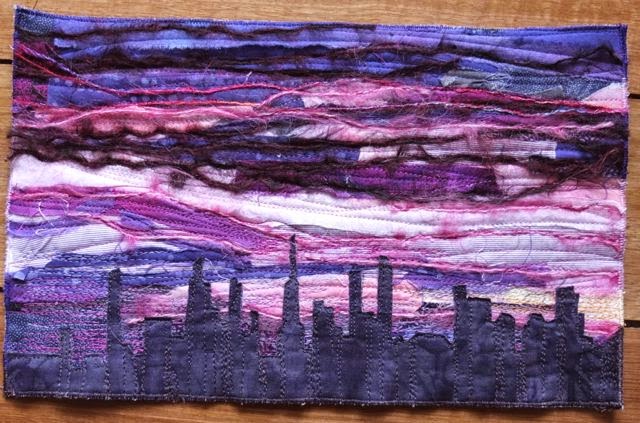
I started with one of my sunset images. (See above.)

I laid out my background fabric, ironed on the Vliesofix, tore fabric into strips and ironed it on. Then I put on the wadding and backing fabric and started to do some free motion sewing.


This turned the image into a much more abstract piece, I had no hope of reproducing the colours, the actual clouds, etc. I think I like this way of working, I just make it up as I go along. Very freeing.
I am also only using fabrics that I already have, no new purchases. This is not particularly hard as it I only need small strips of fabric.

I had drawn up a cityscape earlier, not quite to scale and not particularly accurate but based on the view in my photos.  I transferred it onto Vliesofix and ironed it onto some dark fabric.

I have been rearranging my studio and have recently sorted all my threads.  Therefore, they were in my recent memory and I decided to use some.  The piece has ended up much more textured than I had envisaged but I am happy with that.  I am realising that it is texture that I like and I have been thinking about the earlier tapestries I did in my textiles degree, I used to put in texture in various ways, including using textured yarns. Now this is part of my sewing repertoire too.

The buildings have turned out to be much smaller and less important than I had planned but I don't mind, the focus is on the sky now and the cityscape just gives it context.