Tuesday, February 21, 2017

Scrim and gesso, sample 3

For my third sample, I used Tyvek as well. I traced the pattern onto the Tyvek and sewed over the lines using the machine.
The book I am using as my inspiration, exploring creative surfaces, by Linda Monk, recommends that you pull threads out of the scrim to distress the fabric and give further texture. So I did that.

I also ironed Vliesofix to the scrim so I could attach the Tyvek.
I was using old, small pieces, so they didn't join together perfectly. 
Then I ironed the Tyvek to make it shrink. The sewing tends to inhibit the shrinking somewhat, and 'control' the shrinkage. You have to be careful because it appears that nothing much is happening and then the shrinkage is huge!


I then attached the scrim, which had the Tyvek attached too, to the adhesive interfacing.
I used gesso, watered down a little again.

Once again, I used the acrylic paints. As I am half-heartedly working on a fossil theme, I don't mind the muddy colours. Perhaps they are even opalised!

Monday, February 20, 2017

Scrim and Gesso, sample 2

My second sample was not too different from the first.
I ironed the scrim to the adhesive interfacing, despite it tending to flatten the scrim.
If you do this, remember that scrim is very open weave and you need to cover it so your iron doesn't get all gooey.

I had a stamp that I had carved for another project and tried using it to make an impression in the gesso. The gesso was not very thick, so it left a faint image.
As the gesso attached itself to the stamp, I thought I might as well use that on the interfacing that did not have fabric attached.

It wasn't that impressive but did actually work better once I had painted it.
Once again, I used the leftover acrylic paints. I tried for a more uniform colour this time.


The advantage of this piece is that there is no sewing involved yet. It could be embellished later. 

It does take while to dry though, so I will have to see about using hair dryers, or similar. Our summer here in Melbourne is rather cool (I am NOT complaining) so we can't just let it dry quickly in the sun. 

Sunday, February 19, 2017

Scrim and Gesso, sample 1

Having stupidly said I would take one of our Play Day sessions, I opted to try playing with scrim and gesso. As I haven't done it since last year, and as I can't actually think of a project to use it in, it is all a bit hard to think about.
However, I said I would do it and now I am playing around with it in the hopes that something will come to me that will work in a two hour session.

So ...
Over this weekend I have played.
I have made a few samples but, because I don't have a project in mind, have felt a bit at sea.
I am still considering what I might do about a fossil project that is coming up, so I have done my images based on that. But I haven't really chosen suitable colours, not knowing exactly what I want.

Still, it has been involving and allows me to think about this and not much else. So it has been a bit therapeutic.

I have taken some notes - most unusual for me! But I keep getting side-tracked and trying something that occurs to me at the time. So I had better get it all organised here before I forget what I did.

First try:
I have this image that I have used before. I traced it onto some adhesive interfacing. One thing I did find, ironing it to the adhesive interfacing tends to flatten the scrim, so I might try something different another time. 

Then I sewed it, using free motion on the machine, over the image. 
I decided that I needed to keep the edges controlled better and sewed them down too. 

Then I painted gesso onto it. Some of the gesso seemed rather thick, so I watered down some areas.  I made sure to get the gesso under the layers as much as possible. 

After it has dried, I painted it using some acrylic paint that was left in a palette that I had been using with some children. Waste not, want not. 
So no real plan for the colour scheme!


We have a theme, Ebb and Flow, coming up at the guild, so I might try to incorporate this technique in that. I can see waves and foam in the blue parts. 

Friday, February 17, 2017

Still not white

I have washed my tapestry and it is definitely coloured. I rinsed and scrubbed it but didn't agitate it too much.

It doesn't look all that different, only that the mud and mould is off it (I hope).
Here it is, in the sink. Little bits of dirt have come off, not much colour into the water though.

So now I will let it hang to dry and then will have to make a decision about whether to put it in the challenge - it may smell a little like dirt.
The front
 And the corners have stayed curled, so I'll have to decide about how to finish it off.

The back. 

I quite like the different colours on the back too, so would like to have that visible. Not that it will be if it is attached to a wall or display board.

Maybe I had better reread the entry conditions and see what is ok and what is not.


Saturday, February 11, 2017

My Tapestry Is Not White Anymore!

I have decided that my white tapestry (you can see it here) has been out in The Elements long enough.
I went out and took it out of the flower pot it has been resting in recently - maybe not resting, maybe it was developing.

Anyway, today seems like a good day to have a look at it and see if I think it might be possible to put it in the exhibition. I suspect it may not look that good but who knows?

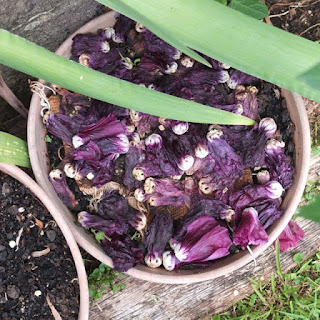
 Here is it in the flower pot. Note that it is under the hollyhock plant and the flowers do really fall on and near it. Then I help it along by putting the ones that miss the pot into the pot. It has built up quite a layer over the last few weeks.

 You can just see the edges and small patches of the tapestry. Two of the edges have curled up, not sure why.

 This is the back. I shouldn't have been surprised to see wildlife living on it but I was! Now they are all safely back in the pot, back under the layer of rotting flowers. 
 This is the disgusting-looking underneath of the flowers, which was in close contact with the tapestry.
 The top, definitely not white anymore. 
Wonder what it will look like when/if I rinse it. 
I will leave it out in the sun for a while to let it totally dry (the underneath was actually damp) and then decide if just brushing it will be enough or if I need to wash it out. 


 I put the flowers back to protect the creatures that were living under the blanket of flowers. 
 The back seems lighter.  
Note the pretty purple warp yarns. Wonder if they will survive washing. 

Tuesday, February 7, 2017

As you ascend the stairs

I often use the underground pass that goes from Flinders St Station to Degraves St in the city (Melbourne).
Last Monday I was greeted with this beautiful, cheery sight.


There used to be what looked to be legal street art there, then one of the pieces was vandalised and it went into disuse. But lately there has been some interesting work there again. I hope this one survives the vandals. 

Sunday, February 5, 2017

FUFO

Finished UFO!!!
I have had a panel lying around for years. I think I did it with Olga Walters, at the Patchwork House, when it was still in Church St, Hawthorn. I can't remember how long ago it was, just that it was quite a while. Maybe 10 - 15 years??

Anyway ...

I found the panel a while ago and decided not to put it away - it has kicked around for almost a year.

The Christmas, New Year and Summer holiday break has been a good time to play around with some ideas. And the weather has been fairly kind to us so far, unlike the rest of Australia.

I decided that I needed to play around with my new(ish) sewing machine and practise my free motion sewing. I even got out two little booklets that Dijanne Cevaal made which show many different free motion NOT stippling designs. Every now and then I get them out to have a play.
Those empty spots are mostly filled in now.

I did some more free motion work on the panel, having decided that I couldn't be bothered doing the whole thing with patterns I had started so long ago. So now it has little sections of different designs where I just played.

What to do with it now?
It is not as if it is gorgeous and should be on one of our walls.
I have been visiting a friend lately and taking my sewing machine. It has a lovely big perspex table to go with it, to help with the larger pieces of sewing. I have been taking it in a cardboard box which is a bit unwieldily.
The panel is exactly the right size for the box - well, it is because I had, with great forethought (or we did it for some reason that I don't remember), made the batting and backing much larger than the front. So I have been able to put a wider border on it than I would usually, and lo and behold, I have a bag for my perspex sewing table.


Now all I have to do is remember to take the legs with it when I take it with me. (I don't use it at home, I have a wonderful Horn table that fits my machine. I love my Horn table. I have had it for years and years and it has been one of the best purchases I have ever made.