Showing posts with label banner quilt. Show all posts

Saturday, January 23, 2016

Finishing off the banner quilt

After I had sewn on the silhouette, I then had to put on the border. I had done some other pieces, when I was doing the design course through the Embroiderers' Guild, that were based on my sunset photos. I had not sewn borders on them, I had just satin-stitched the edges. They didn't have the extra layer of wadding that I have used for the A Matter of Time piece.
You can see one here - I was developing the idea for this piece, unbeknownst to me at the time.

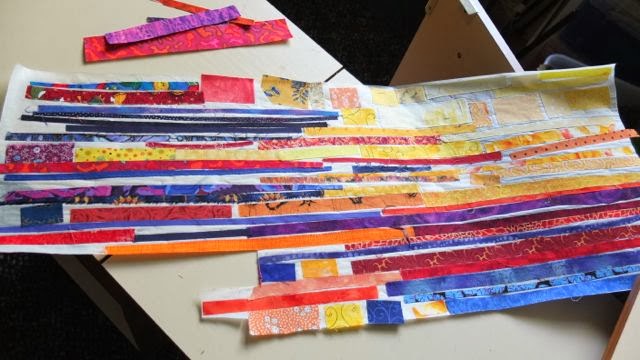
I had done the majority of the sewing on the banner quilt without a backing piece of fabric. This made it rather messy for the machine, meaning I had to brush it out more frequently than usual. It also meant that any mistakes, tangles, etc, will be hidden when I finish it off!

The back of the quilt, before I put the backing on.

However, I did put the backing on before I sewed on the silhouette. And I did some extra quilting in the parts where the tree didn't cover the image. Just to be sure that the backing wouldn't move around.
I remember being told, in my beginner quilting classes, that you should never have more than a handspan free of quilting.

To finish off, I had to decide what I wanted, an obvious border or something that would, hopefully, blend in. As I have been using small pieces of fabric, I didn't have many pieces that would be long enough to do the border.

I managed to find some that seemed to echo the colours on the quilt and joined them together to make my edges. The silhouette made it easier, I could just put black on that edge, and I could use the border to extend the bottom part of the silhouette.
So here it is, the finished piece. 

Friday, January 22, 2016

A Matter of Time

I was extremely happy to hear that my work has been accepted to the exhibition A Matter of Time. The news came through yesterday, absolutely making my day!

You can go to the official page on the link at the side or the Facebook page here (and on the symbol on the official page).

My sunset banner quilt is the piece I entered.
My thoughts were along the lines of how crowded our lives can be, how much we try to fit in. Despite how we try to make time slow down or speed up, time has its own rhythms, the sun will set at the end of every day. (That's not exactly my statement, it is just how my thoughts were going as I worked on it.)

There was a lot of time put into the quilt too.

After I had cut out the silhouette, I laid it out carefully and then ironed it onto the background.

Then I sewed around all the edges. It was quite tricky to see if I had done all the edges but I think I have.

You can see some cones of tapestry yarn in the background. I used some of them to carry colour across areas. I also used various knitting yarns and the ribbon from an old blanket that we had washed. The ribbon disintegrated off the blanket but was still looking good enough to be incorporated into some work. I just couldn't bear to throw it away, as usual.
The whole quilt is made up of strips, scraps and yarns. Except for the backing, of course, and the silhouette.

Thursday, January 21, 2016

Putting the silhouette on

After deciding to go with the tree image, I then had to work out how to put it on.
I had thoughts of putting on a silhouette and then free motion sewing the leaves.

You might notice that the image is the reverse of what I wanted, I forgot that you have to reverse things when using Vliesofix.

It might have turned out alright but this piece, as you can see from the cutting mat, is less than 30cm. It would look different when enlarged to fit a 1metre piece. I thought the leaves would look too little, or that it would take a LOT of sewing to make them look in proportion. 

I decided to just go with the silhouette as it came out. I got my picture, that I had worked on in Photoshop, and decided to print it out full size. This caused some working out too. I know some printers let you organise a large photo to print out at A4 size by dividing the picture up for you but I couldn't remember how to find that function. I did a rough cut and paste of the image, estimating the A4 size. I allowed for some overlap, fortunately. Then I stuck the printouts together and had an almost lined-up tree. 

Because I had practised on the sample above, I remembered that you have to then trace the image in reverse onto the paper side of the Vliesofix. Being frugal, I had printed my image out on used paper, to save the world, and had a bit of trouble seeing the image through all the print. Out came the light box - another great invention. The image was then traced onto the back of the paper, ready to be traced, yet again, onto the Vliesofix.

Eventually, the image was traced onto the Vliesofix and I was able to iron it onto the fabric. All that tracing had gradually reduced the finer details, which was probably a good thing. 

Then came the even more time-consuming task of cutting it out. Many years of teaching children how to cut out various shapes gave me good strategies for going round all the little curly bits. Small, pointy, sharp scissors helped too. 
There are quite a few leftover pieces, some quite tiny. So far I have held on to them, thinking that I might find a use for them in the future. No wonder I have a lot of stuff!

Friday, January 24, 2014

Still working on the wall hanging quilt

After laying out all the pieces of fabric vertically, I then had to take them back off and put Vliesofix on the backs of all of them, then cut them out again.  That took a couple of hours.
Towards the end I thought that I probably hadn't needed to cut them out precisely (which took me an hour and a half) but then, when I became less particular with the cutting out, I realised that you do have to be precise, otherwise there will be little bits of Vliesofix appearing on your quilt top - ask me how I know.

Thank goodness for modern technology!  I took photos of the placement of all those little pieces before I removed them to put the Vliesofix on and then spent AGES looking at the images to see if I could replicate it all.  I managed it reasonably well.

Then it was time to put on the backing, the batting and pin it all together, ready for sewing. 
I accidentally bought bamboo batting (long story) and it has been rather thin, not much loft.  I think there is too much coming through on the backing too, but I will wait till I have finished the quilt before I decide if I will use bamboo again.

Tuesday, January 21, 2014

Attaching all the bits of fabric

I am still working on the quilt, have been for several days now.  I forgot that if I lay out the fabrics and then stick them on with Vliesofix, basically glue them on to my background fabric, then I will have to sew them all on as well. There are a lot of little bits! There will need to be a lot of quilting.
I hope it doesn't change my design too much. I tend to forget that the quilting will change the quilt top to some degree. I spend all this time choosing the colours, laying them out how I want and then I have to quilt it. All that quilting will change the handle of the quilt too. Luckily it is a wall quilt so won't need to be soft and cuddly.
I think my preference when making quilts is for the patchwork part, rather than the quilting. So I tend to  concentrate on the design and then have to try to do unobtrusive quilting.
I found a book at the local library that has been quite interesting to browse. It is called doodle QUILTING by Cherly Malkowski. When I saw it I wondered why anyone would buy such a book but I did borrow it and now I am finding it useful to look at and consider what sort of quilting I can do that will hold down the fabrics, complement the design and not be too obtrusive. So it is obviously a book that people will find useful.
It reminded me of some of the doodling I have been doing lately. It is becoming a bit of a theme in the books and sites I have found recently.
I spent a bit of time choosing what threads to use too - as it is not for actual, everyday use, I can choose some embroidery thread rather than sturdy quilting thread. I don't want to use colours that will be too obvious, so I will choose threads that fit different parts of the quilt and change them according to where on the quilt I am working.


Monday, August 5, 2013

Beneath the Southern Sky still travelling

I received an email recently about the travelling exhibition of banner quilts for Beneath the Southern Sky. I was lucky enough to have my work accepted for this and am always excited to hear about its travels around the world.  I would LOVE  to go to the Festival of Quilts in Birmingham, in the UK and see it in August but, alas, will not be able to.  Here are a couple of links to some of the showings of the works. (Smilebox, American Quilters Society)
It is even going to South Africa - oh to be able to go and see them in another country.  I saw them twice in Australia, at the AQC and the Craft and Sewing Show last year but it would be even more special to be able to see them internationally.
I am so grateful to Brenda Gael Smith for organising the exhibition and putting in all the hard work to have it shown in so many venues. I am still amazed at the fact that I am in an exhibition with so many wonderful textile artists.

My piece in the exhibition was inspired by eucalyptus trees and their wonderful trunks.  I am still taking pictures of trees and branches, fallen or on the trees!  (Just look at my last couple of posts.) There seems to be a theme here.